
If you’ve ever studied thermodynamics, you may have come across the concept of a heating cooling curve. This curve shows the relationship between temperature and time during a phase change, such as when a substance is heated or cooled. Understanding this curve is crucial in many scientific fields, including chemistry and physics.
However, sometimes it can be challenging to interpret and analyze these curves. That’s where a heating cooling curve worksheet comes in handy. These worksheets provide a series of questions and problems that help students practice reading and interpreting heating cooling curves. They also come with an answer key, which allows students to check their work and ensure they are on the right track.
The heating cooling curve worksheet answer key provides not only the correct answers, but often also explanations and step-by-step solutions. This is extremely helpful for students who are struggling with the concept, as it allows them to see where they went wrong and learn from their mistakes. It also helps students review and reinforce their understanding of the material.
Understanding the Heating Cooling Curve Worksheet
The Heating Cooling Curve Worksheet is a valuable tool for understanding the relationship between temperature and energy changes during the heating and cooling process of a substance. By analyzing the curve and completing the associated questions, students can develop a deeper understanding of the concepts of energy transfer and phase changes.
The worksheet typically consists of a heating cooling curve graph, which displays temperature on the x-axis and time or heat energy on the y-axis. The curve shows how the temperature of a substance changes as it is heated or cooled, and also indicates the energy changes associated with phase transitions, such as melting or vaporization.
Key concepts addressed in the worksheet include:
- The difference between heating and cooling
- The relationship between temperature and energy
- The identification of phase changes on the curve
- The calculation of energy changes during phase transitions
The worksheet often includes questions that require students to interpret the curve and make connections between the observed temperature changes and the energy changes that are occurring. These questions may involve calculating the amount of energy required to melt or vaporize a substance, or determining the temperature at which a phase change occurs.
The Heating Cooling Curve Worksheet is an effective tool for reinforcing the principles of thermodynamics and phase changes. By completing the worksheet, students can develop their analytical skills, practice quantitative reasoning, and gain a deeper understanding of the relationship between temperature and energy in the heating and cooling process.
How to Read the Heating Cooling Curve Worksheet
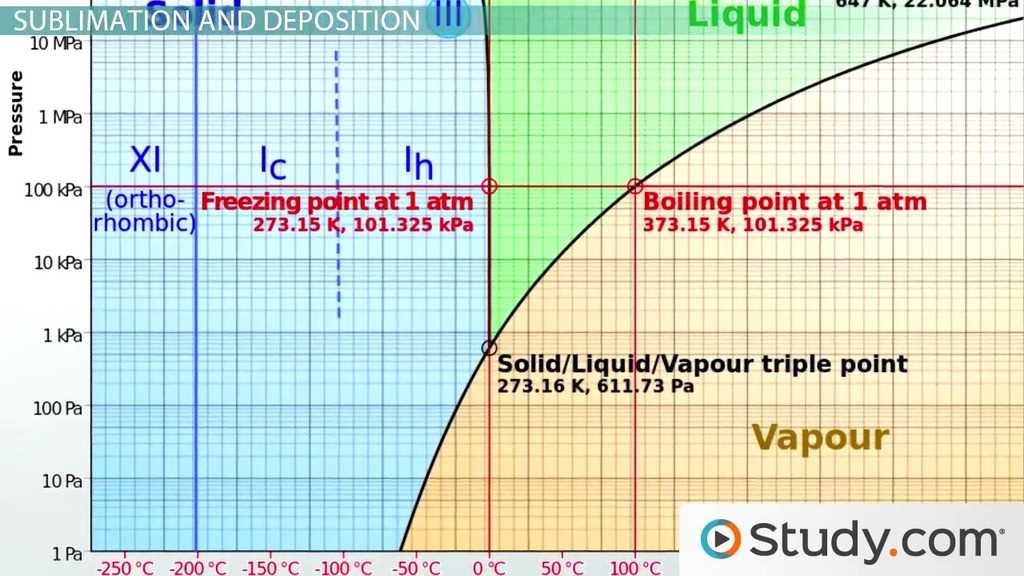
The heating cooling curve worksheet is a graphical representation of temperature changes during the heating and cooling of a substance. It is commonly used in chemistry and physics to illustrate the phase changes and energy transfers that occur as matter is heated or cooled.
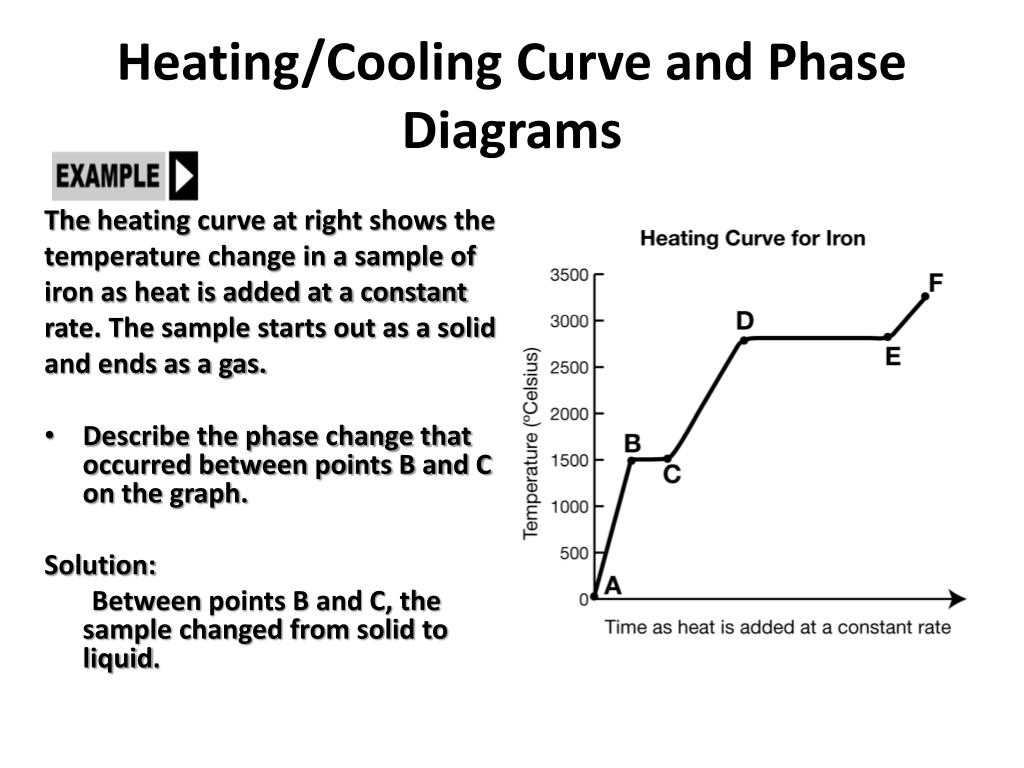
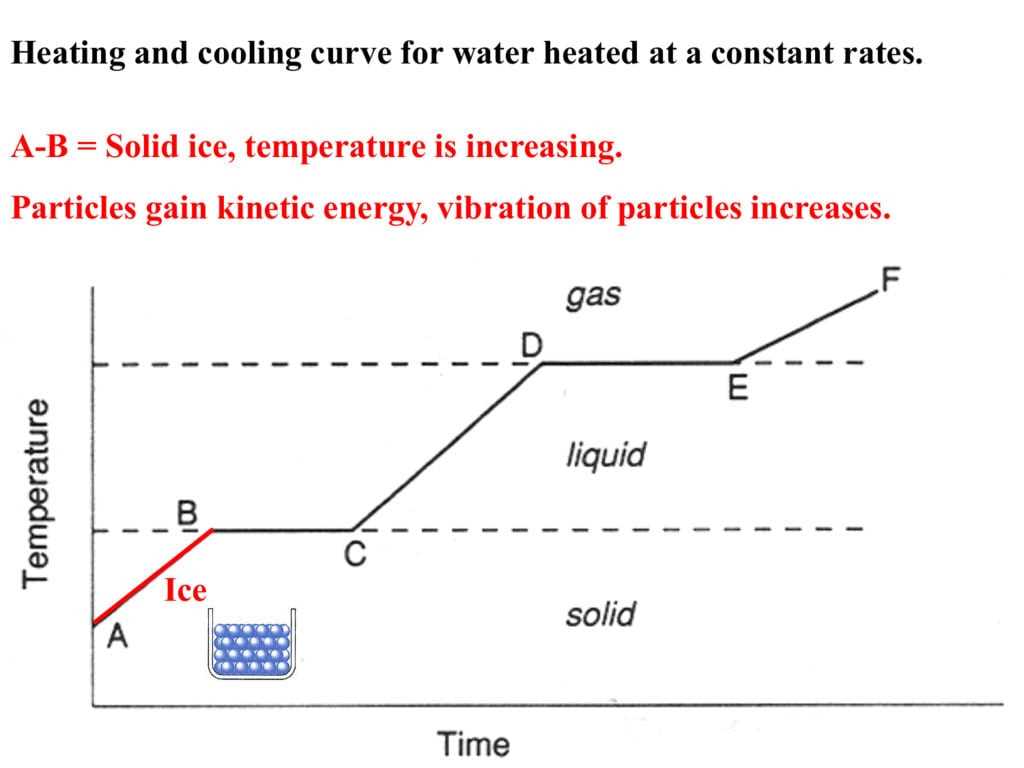
The worksheet typically consists of a graph with temperature plotted on the y-axis and time or heat energy added/removed plotted on the x-axis. The graph is divided into different regions, each representing a specific phase of matter (solid, liquid, and gas) or a phase change (melting, boiling, condensation, freezing).
Reading the Worksheet:
- Heating Section: The heating section of the graph shows the temperature of the substance increasing as heat energy is added. The substance starts at a specific temperature (usually in the solid phase) and gradually heats up, transitioning through different phases as it reaches its melting point and boiling point.
- Plateau Regions: The plateau regions in the heating section indicate phase changes. These regions show that while heat energy is being added, the temperature remains constant as the substance undergoes a phase change. For example, during the melting of ice, the temperature remains constant at 0 degrees Celsius until all the ice has melted.
- Cooling Section: The cooling section of the graph shows the temperature of the substance decreasing as heat energy is removed. The substance starts at a specific temperature (usually in the gas phase) and gradually cools down, transitioning through different phases as it reaches its condensation point and freezing point.
- Plateau Regions in Cooling Section: Similar to the plateau regions in the heating section, the plateau regions in the cooling section indicate phase changes. These regions show that while heat energy is being removed, the temperature remains constant as the substance undergoes a phase change. For example, during the condensation of water vapor, the temperature remains constant at 100 degrees Celsius until all the vapor has condensed into liquid water.
By understanding how to read the heating cooling curve worksheet, students can gain insight into the behavior of substances as they are heated or cooled and can analyze the energy transfers and phase changes that occur during these processes.
Common Questions and Concerns About the Heating Cooling Curve Worksheet

When it comes to the heating cooling curve worksheet, students often have common questions and concerns. Understanding the concept of the heating cooling curve can be challenging, but with the right guidance, it becomes easier to comprehend. Here are some frequently asked questions and concerns about the worksheet:
1. What is a heating cooling curve?
A heating cooling curve is a graphical representation that shows the changes in temperature of a substance as it is heated or cooled. The curve depicts the relationship between temperature and time during both the heating and cooling processes.
2. How can I interpret the heating cooling curve?
To interpret the heating cooling curve, it is important to understand the key features. The curve will have two distinct sections: the heating section and the cooling section. The heating section shows the change in temperature as the substance is heated, while the cooling section shows the change in temperature as the substance is cooled. The plateau sections in the curve indicate when a phase change is occurring, such as the substance transitioning from a solid to a liquid or a liquid to a gas. The slope of the curve during the heating section indicates the substance’s specific heat capacity.
3. How can I use the heating cooling curve to determine the substance being tested?
By analyzing the heating cooling curve and examining the plateau sections, you can determine the substance being tested. Each substance has its own unique heating cooling curve due to its specific heat capacity and the energy required for its phase changes. Comparing the curve to known substances or using provided reference materials can help identify the substance being tested.
4. What are some common errors students make when completing the worksheet?
One common error is not properly labeling the axes of the heating cooling curve. It is important to label the x-axis as time and the y-axis as temperature. Another common mistake is not accurately identifying the plateau sections, which can lead to incorrect interpretations of the graph. Students should also pay attention to the units of measurement and ensure consistent usage throughout the worksheet.
5. How can I practice and improve my understanding of the heating cooling curve?
To practice and improve your understanding of the heating cooling curve, it is recommended to complete additional worksheets or exercises. You can also try conducting experiments in the laboratory that involve heating and cooling substances, and graphing the temperature changes over time. Seeking assistance from your teacher or classmates and discussing the concepts can also help reinforce your understanding.
Overall, the heating cooling curve worksheet can be challenging, but by asking questions and seeking clarification, students can overcome any concerns and develop a strong understanding of the topic.
Tips for Using the Heating Cooling Curve Worksheet Effectively
When working with the heating cooling curve worksheet, there are several tips that can help you use it effectively. Here are some key points to keep in mind:
1. Understand the purpose: Before starting the worksheet, make sure you understand the purpose of the heating cooling curve. It is a graphical representation of the temperature changes that occur when a substance is heated or cooled. The worksheet is designed to help you interpret and analyze these changes.
2. Familiarize yourself with the axes: The heating cooling curve worksheet typically includes a graph with temperature on the y-axis and time on the x-axis. Take the time to familiarize yourself with these axes and understand how they relate to the temperature changes shown in the graph.
3. Identify the phases of matter: The heating cooling curve shows different phases of matter, such as solid, liquid, and gas. Pay attention to the points on the graph where these phase changes occur, as they can provide important information about the substance being studied.
4. Analyze the slopes: The slopes of the heating and cooling curves can give you insights into the energy changes happening during the process. Steeper slopes indicate faster temperature changes and may suggest higher rates of energy transfer.
5. Use the provided data: The worksheet may include data points that describe the temperature changes at specific intervals. Make sure to use these data points in your analysis and interpretation of the graph.
6. Ask questions: Don’t be afraid to ask questions if you are unsure about any aspect of the worksheet. It’s better to seek clarification and fully understand the concepts being presented than to make assumptions.
By following these tips, you can make the most of the heating cooling curve worksheet and gain a better understanding of temperature changes and phase transitions in different substances.
Conclusion
The heating cooling curve worksheet is a helpful tool for students to practice interpreting temperature changes during phase changes. By plotting temperature data and identifying key points on the graph, students can analyze the energy changes that occur during heating and cooling processes. The answer key provides a guide for students to check their work and ensure they are correctly interpreting the graph.
Through this activity, students can develop their skills in graph analysis, data interpretation, and understanding the principles of heating and cooling. By studying the heating cooling curve, students can learn about the different phases of matter, the energy changes associated with phase changes, and the role of heat in these processes.
The use of the heating cooling curve worksheet and answer key can help students reinforce their understanding of these concepts and build their confidence in analyzing temperature changes during phase changes. It is a valuable resource for teachers to assess students’ understanding and provide additional support as needed.
Overall, the heating cooling curve worksheet and answer key are effective tools for engaging students in hands-on learning and promoting a deeper understanding of the principles of heating and cooling. By using these resources, students can enhance their scientific literacy and develop important skills for future scientific inquiry.