
Free body diagrams are an essential tool in physics for understanding the forces acting on an object. They provide a visual representation of the forces and help in analyzing the motion of the object. A free body diagram is a simplified drawing that shows only the forces acting on an object, without the object itself.
This worksheet provides answers to various free body diagram problems. It includes diagrams with multiple forces acting on an object, and the goal is to identify and label all the forces involved. Each problem is accompanied by a step-by-step solution that explains how to approach the problem and find the correct answer.
By practicing these free body diagram problems with the provided answers, students can enhance their understanding of forces and motion in physics. They can gain confidence in identifying and analyzing forces acting on different objects and situations. This worksheet serves as a valuable resource for students studying physics or preparing for exams in the subject.
What is a Free Body Diagram?
A free body diagram is a visual representation used in physics to analyze forces acting on an object. It is a simplified sketch that isolates the object of interest and shows all the forces acting on it. By labeling and depicting the forces, a free body diagram can help determine the net force applied to an object and its resulting motion.
In a free body diagram, the object of interest is represented by a dot or a simple shape, such as a square or a circle. This dot or shape represents the center of mass of the object. The forces acting on the object are then represented by arrows originating from the dot or shape. The length and direction of these arrows indicate the magnitude and direction of the forces.
It is important to note that free body diagrams only consider forces acting on the object, ignoring any external factors such as friction or air resistance. This simplification allows for a clearer understanding and analysis of the forces at play.
Commonly represented forces in free body diagrams include gravitational force, normal force, tension force, applied force, and frictional force. Each force is depicted with a separate arrow, labeled with its corresponding symbol and magnitude if known.
By creating and analyzing free body diagrams, physicists can better understand and predict the motion of objects in various scenarios. These diagrams are particularly useful in solving problems related to dynamics, such as calculating acceleration, force, or tension in systems.
Overall, free body diagrams provide a visual representation that simplifies the analysis of forces acting on an object, aiding in the understanding and calculation of its motion in physics.
Definition and Purpose
Free body diagrams are a visual representation of the forces acting on an object, without considering its surroundings. They provide a way to analyze and understand the forces that are influencing the motion of an object in a specific situation. By isolating the object and focusing only on the forces acting on it, free body diagrams allow for a clear and concise representation of the forces at play.
The purpose of creating and using free body diagrams is to help solve problems related to the motion and equilibrium of objects. By breaking down a complex system into individual forces that act on a single object, it becomes easier to analyze the situation and determine the net force and resulting motion. Free body diagrams serve as a tool to identify and analyze all the forces acting on an object, including contact forces, gravity, tension, friction, and any other relevant forces.
Free body diagrams are commonly used in physics and engineering to solve problems involving forces, such as determining the tension in a rope, the acceleration of an object, or the equilibrium conditions of a system. They make it possible to visualize and understand the forces that are at work in a given situation, and enable individuals to accurately calculate and predict the motion of objects.
When creating a free body diagram, it is important to accurately represent the magnitude and direction of the forces acting on the object. This can be done by using arrows to indicate the direction and length of each force, and labeling them with their corresponding values. Additionally, it is crucial to clearly identify the object of interest, as well as any assumptions or simplifications made in the diagram.
In conclusion, free body diagrams provide a way to analyze and understand the forces acting on an object in a specific situation. They serve as a tool to solve problems related to the motion and equilibrium of objects, by isolating the object and focusing only on the forces acting on it. Free body diagrams are a vital tool in the fields of physics and engineering, allowing individuals to accurately analyze and predict the motion of objects by taking into account all relevant forces.
How to Create a Free Body Diagram
When studying physics or engineering, one of the most important skills to develop is the ability to create a free body diagram. A free body diagram is a visual representation of the forces acting on an object, and it allows you to analyze and understand the motion of that object.
To create a free body diagram, start by identifying the object you want to analyze. This could be anything from a car to a satellite to a person. Once you have identified the object, draw a simple outline or shape to represent it on your diagram.
Next, identify all the forces acting on the object. Forces can include gravity, tension, friction, and any other external forces. Label each force on your diagram with an arrow, pointing in the direction of the force. The length of the arrow represents the magnitude of the force.
In addition to external forces, it is also important to include any internal forces acting on the object. Internal forces are forces that act within the object and can include things like tension in a rope or compression in a spring.
Once you have identified and labeled all the forces, you can analyze the motion of the object. If the forces are balanced, the object will remain at rest or continue moving with a constant velocity. If the forces are unbalanced, the object will accelerate in the direction of the net force.
Creating a free body diagram is an important skill in physics and engineering, as it allows you to visualize and analyze the forces acting on an object. With practice, you will be able to accurately represent these forces and gain a deeper understanding of the object’s motion.
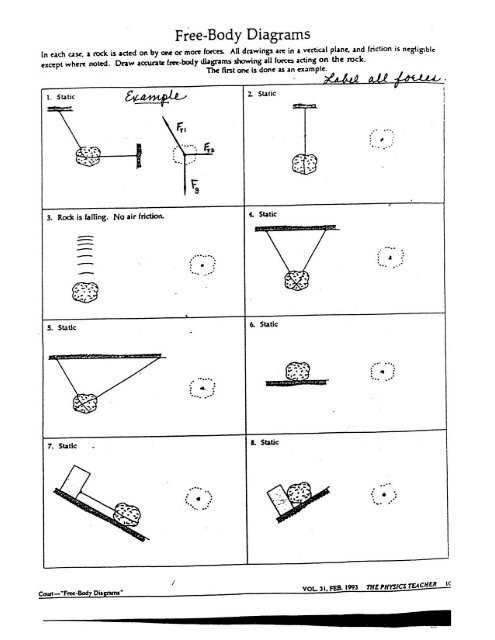
Example Questions and Answers
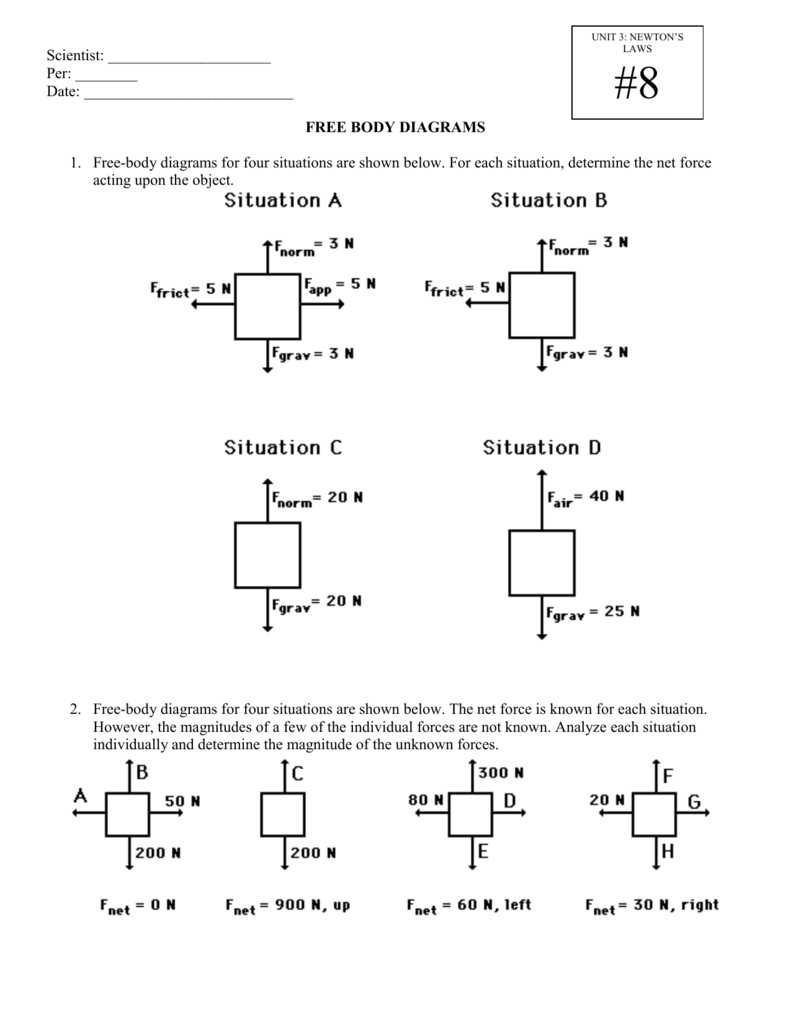
When learning about free body diagrams, it can be helpful to practice with example questions and review the corresponding answers. This helps reinforce understanding of the concept and ensures that you are able to accurately represent the forces acting on an object.
Question 1:
Draw a free body diagram for a car accelerating forward on a flat road.
Answer:
In this case, the car experiences several forces. The first force is the force of gravity, which acts downwards. The second force is the normal force exerted by the road on the car, which acts upwards. The third force is the force of friction between the tires and the road, which acts in the opposite direction of the car’s motion. Finally, there is the force of the engine, which propels the car forward. The free body diagram would include arrows representing these forces in their appropriate directions.
Question 2:
Draw a free body diagram for a book resting on a table.
Answer:
In this case, the book experiences two main forces. The force of gravity acts downwards, while the normal force exerted by the table acts upwards. These two forces are balanced, as the book is not moving vertically. Therefore, the free body diagram would have arrows representing these forces in opposite directions and of equal magnitude.
Question 3:
Draw a free body diagram for a person standing on a scale.
Answer:
In this case, the person experiences three main forces. The force of gravity acts downwards, while the normal force exerted by the scale acts upwards. These two forces are balanced, as the person is not moving vertically. However, there is also the force of the person’s weight, which is the product of their mass and the acceleration due to gravity. This force is also directed downwards. Therefore, the free body diagram would have arrows representing these forces in their appropriate directions.
- Overall, practicing drawing free body diagrams and understanding the forces involved in different scenarios is crucial for understanding the concept of forces and their effects on objects. By reviewing example questions and their corresponding answers, you can improve your skills in representing forces accurately and comprehensively.
Common Mistakes to Avoid
When working with free body diagrams, it is important to be aware of common mistakes that can occur. By avoiding these mistakes, you can ensure that your diagrams accurately represent the forces acting on an object. Here are some common mistakes to be mindful of:
- Missing forces: One of the most common mistakes is forgetting to include all the forces acting on an object. Make sure to carefully consider all the forces, including any frictional forces, tension forces, or normal forces.
- Incorrect force direction: Another common mistake is representing the force direction incorrectly. Always double-check the direction of each force and ensure that it aligns with the motion or equilibrium of the object.
- Unequal force magnitudes: It is crucial to accurately represent the magnitudes of the forces. Be mindful of the scale you are using and ensure that the sizes of the arrows accurately reflect the relative magnitudes of the forces.
- Overlooking the action-reaction pairs: Action-reaction pairs are pairs of forces that occur whenever one object exerts a force on another object. These pairs should be represented in the free body diagram. Failing to include action-reaction pairs can lead to inaccurate representations of the forces.
- Improper labeling: Labels play an important role in free body diagrams. Make sure to clearly label each force with its corresponding name and direction. This helps to avoid confusion and ensures a clear representation of the forces.
By being aware of these common mistakes and taking the time to carefully construct your free body diagrams, you can avoid errors and accurately represent the forces acting on an object. Remember to double-check your work and ask for help if you’re unsure. With practice, you will become more proficient in creating accurate free body diagrams.