
Quilting is a beautiful and intricate art form that has been passed down through generations. It involves sewing multiple layers of fabric together to create a warm and cozy blanket or bedding. One of the most exciting aspects of quilting is the ability to create unique and intricate patterns using various techniques, including transformations.
A transformation is a mathematical operation that changes the position, size, or shape of an object. In quilting, transformations can be used to create stunning and visually appealing designs. By using the transformations worksheet answer key, quilters can learn how to manipulate and transform basic quilt blocks to create complex and striking patterns.
The transformations worksheet answer key provides quilters with step-by-step instructions on how to perform different transformations, such as rotations, reflections, translations, and dilations. Each transformation is clearly explained and accompanied by visual diagrams, making it easy for quilters of all skill levels to follow along and learn the techniques.
By using the transformations worksheet answer key, quilters can take a basic quilt block and transform it into a whole new design. For example, a simple square block can be rotated to create a diamond pattern, or reflected to create a kaleidoscope effect. These transformations can be combined and repeated to create intricate and eye-catching quilt patterns that are sure to impress.
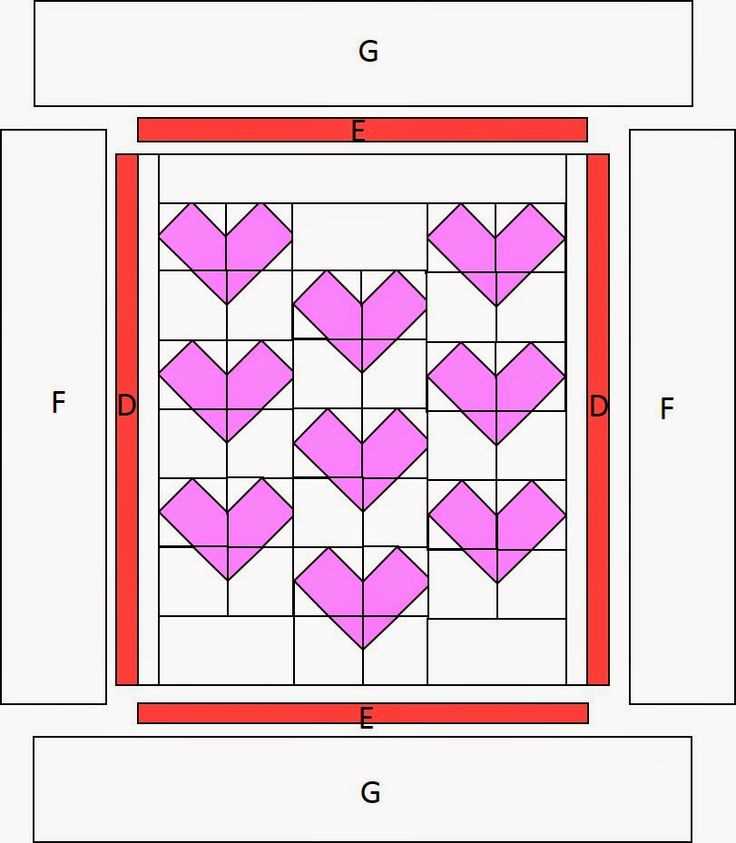
Create a Quilt Pattern Using Transformations Worksheet Answer Key
A quilt is a beautiful and practical way to enhance the decor of any living space. By combining various shapes and patterns, you can create a stunning quilt pattern that reflects your personal style. One way to create a unique quilt pattern is by using transformations, such as translations, rotations, and reflections. These transformations allow you to manipulate the position, orientation, and symmetry of different shapes, resulting in a visually appealing design.
The “Create a Quilt Pattern Using Transformations” worksheet provides a step-by-step guide to help you create your own quilt pattern using transformations. The answer key provides the correct solutions for each step, allowing you to check your work and ensure accuracy. The worksheet includes various exercises that require you to perform different transformations on given shapes, such as translating a square, rotating a triangle, or reflecting a hexagon. By practicing these transformations, you will gain a better understanding of how they work and how they can be combined to create interesting quilt patterns.
Worksheet Instructions:
- Start by selecting a shape to serve as the base of your quilt pattern. This shape will be repeated and transformed to create the overall design.
- Follow the instructions for each exercise, which will guide you through the process of applying different transformations to the base shape. Use a ruler and protractor to accurately measure and mark the desired transformations.
- Once you have completed all the exercises, step back and assess your design. Make any necessary adjustments to achieve the desired pattern and symmetry.
- Transfer your final design onto graph paper, using each square on the paper to represent one unit of measurement. This will ensure that your quilt pattern is accurately replicated in fabric.
- Finally, select fabrics that complement your design and start sewing! Cut out the shapes from your pattern and piece them together according to your design. Don’t forget to leave a seam allowance for sewing.
Creating a quilt pattern using transformations can be a fun and creative process. The “Create a Quilt Pattern Using Transformations” worksheet and answer key provide a helpful resource to guide you through this process and ensure accurate results. Whether you are a beginner or an experienced quilter, experimenting with transformations can give your quilt pattern a unique and artistic flair.
Understanding Transformations in Quilt Patterns
Quilt patterns are a beautiful and intricate form of art that have been passed down through generations. They often incorporate various geometric shapes and designs that are created using transformations. Transformations are a fundamental concept in mathematics and they play a crucial role in creating visually appealing quilt patterns.
There are several types of transformations that are commonly used in quilt patterns, including translation, rotation, reflection, and dilation. These transformations allow quilt designers to create interesting and unique patterns by altering the position, orientation, and size of individual quilt blocks.
- Translation: Translation involves moving a quilt block along a straight line without changing its shape or size. This can be done horizontally, vertically, or diagonally, and it helps create repeating patterns within a quilt.
- Rotation: Rotation involves turning a quilt block around a fixed point, such as a corner or the center. It can be done in clockwise or counterclockwise direction, and it adds movement and dynamism to the overall quilt design.
- Reflection: Reflection involves flipping a quilt block across a line, such as a horizontal or vertical axis. This creates mirror images and symmetry within the quilt pattern.
- Dilation: Dilation involves changing the size of a quilt block by either enlarging or reducing it. This can be done uniformly or non-uniformly, and it allows for variations in scale and proportion.
By understanding and applying these transformations effectively, quilt designers can create intricate and visually appealing patterns that showcase their creativity and mathematical skills. Transformations bring depth, symmetry, and movement to quilt patterns, making them not only functional but also works of art that can be admired and cherished for generations to come.
Exploring Different Quilt Block Designs
Quilting is a popular craft that involves sewing together different fabrics to create a decorative blanket or quilt. One important aspect of quilting is the design of the quilt block. A quilt block is a smaller piece of fabric that is sewn together with other blocks to create the overall pattern of the quilt. There are countless different quilt block designs, each with its own unique look and feel.
One way to explore different quilt block designs is by using transformations. Transformations involve changing the size, shape, or orientation of a quilt block to create a new design. For example, you can rotate a square block to create a diamond shape, or stretch a rectangular block to create a more elongated design. By experimenting with different transformations, you can create an endless variety of quilt block designs.
Another way to explore different quilt block designs is by using different colors and fabrics. The choice of colors and fabrics can greatly impact the overall look of a quilt block. For example, using bright, vibrant colors can create a bold and eye-catching design, while using muted, earth-tone fabrics can create a more subtle and rustic look. By playing around with different color combinations and fabric choices, you can create a quilt block that is truly unique and personalized.
Ultimately, the beauty of quilting lies in the endless possibilities for creativity and personal expression. Whether you’re experimenting with transformations or playing with colors and fabrics, exploring different quilt block designs is a fun and rewarding process. So, grab your sewing machine and get ready to embark on a quilting adventure!
Using the Transformations Worksheet Answer Key
When working with quilt patterns, it is important to understand the concept of transformations. Transformations are used to create different variations of a quilt design by manipulating its shape, size, and orientation. The Transformations Worksheet Answer Key provides a valuable resource for understanding and practicing these techniques.
The Transformations Worksheet Answer Key contains a set of exercises that allow you to practice applying various transformations to quilt patterns. These exercises include rotations, reflections, translations, and dilations. By following the step-by-step instructions provided in the answer key, you can learn how to properly perform these transformations and create unique quilt designs.
The answer key also helps you understand the effects of each transformation on the quilt pattern. It explains how rotations can change the direction of the design, reflections can create mirror images, translations can shift the pattern horizontally or vertically, and dilations can resize the pattern. Understanding these effects is crucial for creating harmonious and visually appealing quilt designs.
Using the Transformations Worksheet Answer Key is a great way to develop your skills in manipulating quilt patterns. By practicing these transformations, you can gain confidence in your ability to create and modify quilt designs according to your own preferences. Whether you are a beginner or an experienced quilter, the answer key offers a valuable resource for learning and improving your quilt design skills.
Step-by-Step Guide to Creating a Quilt Pattern
Creating a quilt pattern can be a fun and rewarding project. Whether you are an experienced quilter or just starting out, following a step-by-step guide can help you create a quilt pattern that is both visually appealing and functional. Here is a simple guide to get you started on your quilt pattern:
1. Choose a Design
The first step in creating a quilt pattern is to choose a design. There are endless possibilities when it comes to quilt designs, so take some time to explore different patterns and find one that you love. Consider the size and complexity of the design, as well as the colors and fabrics you want to use.
2. Gather Materials
Once you have chosen a design, gather all the materials you will need to create your quilt pattern. This includes fabric, batting, a rotary cutter, a cutting mat, quilting rulers, and a sewing machine. Make sure to have enough fabric for your chosen design, as well as any additional fabric for backing and binding.
3. Measure and Cut Fabric
Next, measure and cut your fabric according to the dimensions of your chosen design. Use quilting rulers and a rotary cutter to ensure accurate and precise cuts. Take your time and double-check your measurements to avoid any mistakes.
4. Arrange and Sew Blocks
Once you have all your fabric pieces cut, arrange them in the desired pattern. This is where your creativity and personal style can shine. Experiment with different arrangements until you find one that you love. Then, sew the fabric pieces together to create blocks.
5. Add Borders and Binding
After you have sewn all your blocks together, it’s time to add borders and binding to your quilt pattern. Borders add a finished look to the quilt and can be made from the same fabric as your blocks or a contrasting fabric. Binding is the fabric that goes around the edges of the quilt to hold the layers together.
6. Quilt the Layers
The final step in creating a quilt pattern is to quilt the layers together. This can be done by machine or by hand, depending on your preference. Quilting adds texture and stability to the quilt, and there are many different quilting designs to choose from.
By following this step-by-step guide, you can create a beautiful and unique quilt pattern. Remember to take your time, be creative, and enjoy the process of quilting!
Choosing Fabrics and Colors for Your Quilt
When it comes to creating a quilt, one of the most important decisions you’ll make is choosing the fabrics and colors. The fabric you choose will not only determine the overall look and feel of your quilt, but it will also affect how easy or difficult it is to work with.
Consider the theme and purpose of your quilt. Are you creating a quilt with a specific theme, such as a baby quilt or a holiday quilt? If so, you’ll want to choose fabrics and colors that align with that theme. For example, a baby quilt may include soft pastel colors and fabrics with cute animal prints, while a holiday quilt may feature festive reds and greens.
Think about the overall design and pattern. The fabrics and colors you choose should complement the design and pattern of your quilt. If you have a bold and intricate design, you may want to choose solid or neutral fabrics to let the design shine. On the other hand, if your design is more simple, you may want to choose fabrics with prints or patterns to add visual interest.
Consider the scale and contrast of the fabrics. When selecting fabrics, it’s important to consider the scale and contrast. Scale refers to the size of the prints on the fabric, while contrast refers to the difference in color and value between fabrics. If you have fabrics with large-scale prints, you may want to pair them with smaller-scale prints or solids to create balance. Similarly, if you have fabrics with high contrast, you may want to mix in fabrics with lower contrast for a more harmonious look.
Don’t be afraid to play with color. Quilting is a creative outlet, so don’t be afraid to experiment with color! You can choose a color scheme that is complementary, analogous, or monochromatic, depending on the look you want to achieve. Remember, the fabric you choose can make a big impact on the final result, so have fun and let your creativity shine!
Finishing Touches and Tips for Quilt Making
Quilt making is a beautiful and intricate art form that requires attention to detail and precision. As you near the end of creating your quilt pattern using transformations, there are a few finishing touches and tips that can help you achieve a polished and professional result.
1. Pressing and Ironing
One of the most important steps in quilt making is pressing and ironing your fabric. This helps to create crisp and neat seams, ensuring that your quilt top lays flat and looks cohesive. Remember to use a pressing cloth or ironing board cover to protect your fabric, and always press, rather than drag, the iron across the fabric.
2. Stitch in the Ditch
To create beautifully quilted patterns, consider using the “stitch in the ditch” technique. This involves stitching along the seams of your quilt top, which creates a subtle and cohesive quilting design. It helps to secure the layers of the quilt and gives it a professional finish.
3. Binding
Finishing the edges of your quilt with binding will give it a clean and polished look. There are various methods for binding, such as machine binding or hand binding. Whichever method you choose, make sure to take your time and sew carefully to ensure a tidy and even finish.
4. Labeling
Don’t forget to add a label to your quilt, especially if it is a gift or a personal project. A label adds a personal touch and helps to document the quilt’s history. It can include your name, the date, and any other relevant information about the quilt.
5. Take Your Time and Enjoy
Quilt making is a labor of love, so be sure to take your time and enjoy the process. It’s important to have patience and work at your own pace, as rushing can lead to mistakes. Take breaks when needed and remember to step back and appreciate your hard work.
By following these finishing touches and tips, you can create a quilt pattern using transformations with a professional and polished look. Remember to have fun and enjoy the process, as quilt making is a rewarding and creative hobby. Happy quilting!