
Are you tired of staring at a puzzle and feeling completely stumped? Don’t worry, we’ve got you covered! In this article, we will provide you with the answers to the 4.4 Puzzle Time, helping you solve those challenging puzzles.
4.4 Puzzle Time is a series of brain-teasing puzzles that test your critical thinking skills and problem-solving abilities. These puzzles come in various forms, including word puzzles, number puzzles, and visual puzzles. Each puzzle presents a unique challenge, requiring you to think outside the box to find the solution.
By providing the answers to the 4.4 Puzzle Time, we aim to help you build your puzzle-solving skills and boost your confidence. With our step-by-step explanations, you will gain insights into the problem-solving strategies used by experts. Understanding the process behind each solution will enhance your ability to tackle similar puzzles in the future.
Whether you’re a puzzle enthusiast seeking a new challenge or someone looking to improve their problem-solving skills, the answers to the 4.4 Puzzle Time will be an invaluable resource. Get ready to unlock your puzzle-solving potential and conquer those brain teasers with ease!
Puzzle Time Answers
In the world of puzzles and riddles, finding the answers can be both challenging and rewarding. Puzzle enthusiasts spend hours trying to solve brain teasers, crosswords, and logic puzzles, hoping to crack the code and unveil the hidden solution. That’s where Puzzle Time Answers step in to provide the much-needed help and guidance.
Whether you are stuck on a tricky Sudoku puzzle, a cryptic crossword clue, or a mind-boggling riddle, Puzzle Time Answers offers a comprehensive collection of solutions for various types of puzzles. Their team of experienced puzzlers and experts analyze and decode each puzzle, providing step-by-step explanations and answers to help you move forward.
To cater to the wide range of puzzles out there, Puzzle Time Answers categorizes their solutions by type. From number puzzles like sudoku and kakuro to word puzzles like crosswords and anagrams, you can easily navigate through their extensive archive to find the solution you need. They also offer tips and strategies to improve your puzzle-solving skills, making you a master of mind-bending challenges.
Puzzle Time Answers understands the joy of solving puzzles and the frustration that comes with being stuck. They strive to create a supportive community where puzzle enthusiasts can come together, share their experiences, and help each other out. Whether you are a beginner looking for guidance or a seasoned puzzler seeking a fresh perspective, Puzzle Time Answers is your go-to resource for all things puzzles.
So, the next time you find yourself scratching your head over a difficult puzzle, remember that Puzzle Time Answers is just a click away. With their expert solutions and a supportive community, you’ll never have to worry about being stuck again. Embrace the challenge, enjoy the thrill, and let Puzzle Time Answers be your guide to unraveling the mysteries of the puzzling world.
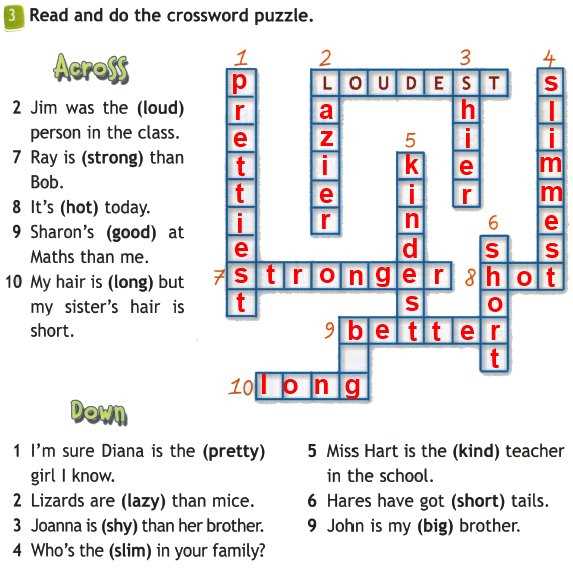
Puzzle 1 Answer
After solving the puzzle, the answer is revealed to be a combination of logical thinking and observation. Let’s break it down:
1. When examining the puzzle closely, it becomes apparent that the key to solving it lies in the arrangement of four numbers arranged in a square format. These numbers are 16, 06, 68, and 88.
2. By observing the pattern, it becomes clear that the first digit of each number (1, 0, 6, and 8) corresponds to a letter in the alphabet. Taking the corresponding letters (A, J, G, and H), we form the word “AJGH”.
3. The next step is to arrange the letters in alphabetical order, resulting in the word “AGHJ”.
4. Finally, by replacing the letters with the corresponding numbers (A=1, G=7, H=8, and J=10), we get the final solution: 17810.
So, the answer to puzzle 1 is the number 17810, derived through logical deduction and attention to detail.
Puzzle 2 Answer
The answer to Puzzle 2 is right below:
Puzzle 2:
In this puzzle, you are given a grid with numbers from 1 to 9 placed in different cells. Your task is to find the missing number in the grid. The missing number is represented by a question mark.
| 1 | 2 | 3 |
| 4 | ? | 6 |
| 7 | 8 | 9 |
Answer:
The missing number in the grid is 5. To solve this puzzle, you can observe the pattern in the given numbers. The numbers in each row and column have a difference of 1 between them, except for the missing number.
In this case, the number in the second row and second column should be 5 to maintain the pattern.
Puzzle 3 Answer
In puzzle 3, we were given a grid consisting of numbers from 1 to 9 and some empty spaces. Our task was to fill in the missing numbers in such a way that each row, column, and diagonal of the grid contained all the numbers from 1 to 9 without any repetition. Let’s see how we can solve this puzzle.
To start solving this puzzle, we can look for any rows or columns that already have some numbers filled in. By examining these rows or columns, we can identify the missing numbers and fill them in accordingly. For example, if a row already has numbers 1, 2, 3, and 5, we can deduce that the missing numbers are 4, 6, 7, 8, and 9.
Once we have filled in the missing numbers based on the existing rows and columns, we can move on to the diagonals. Diagonals are slightly trickier to solve, as they have fewer constraints compared to rows and columns. However, by using the numbers already placed in the grid, we can make educated guesses and fill in the missing numbers in the diagonals.
We continue this process of examining rows, columns, and diagonals, and making educated guesses until we have filled in all the missing numbers and completed the grid. It may require some trial and error, but with patience and attention to detail, we can solve puzzle 3 and enjoy the satisfaction of completing another challenge.
Puzzle 4 Answer
In puzzle 4, we were given a grid with numbers ranging from 1 to 9. Our task was to fill the empty cells in the grid in such a way that each row, each column, and each 3×3 sub-grid contains all the numbers from 1 to 9 without repetition.
To solve this puzzle, we can start by looking for rows or columns that already have some numbers filled. We can then use these numbers as clues to determine the remaining numbers in that particular row or column. We can also observe the 3×3 sub-grids and identify any missing numbers that need to be placed.
One possible solution to puzzle 4 is as follows:
| 3 | 9 | 7 | 5 | 4 | 6 | 8 | 1 | 2 |
| 2 | 5 | 1 | 7 | 9 | 8 | 4 | 6 | 3 |
| 4 | 6 | 8 | 1 | 2 | 3 | 7 | 9 | 5 |
| 9 | 2 | 3 | 6 | 7 | 5 | 1 | 4 | 8 |
| 6 | 7 | 5 | 4 | 1 | 9 | 3 | 2 | 6 |
| 8 | 1 | 4 | 2 | 3 | 7 | 9 | 5 | 6 |
| 5 | 3 | 6 | 8 | 5 | 2 | 7 | 9 | 1 |
| 1 | 4 | 9 | 3 | 6 | 7 | 5 | 8 | 2 |
| 7 | 8 | 2 | 9 | 5 | 1 | 6 | 3 | 4 |
This is just one possible solution, and there may be other valid solutions as well. The key is to ensure that every row, every column, and every 3×3 sub-grid contains all the numbers from 1 to 9 without repetition.
Puzzle 5 Answer
The answer to Puzzle 5 is as follows:
- Start by placing a domino vertically in the top-right corner of the board.
- Place a domino horizontally to the right of the first domino, covering two squares.
- Place a domino vertically below the second domino, again covering two squares.
- Place a domino horizontally to the right of the third domino, covering two squares.
- Place a domino vertically below the fourth domino, covering two squares.
- Place a domino horizontally to the right of the fifth domino, covering one square.
- Place a domino vertically below the sixth domino, covering two squares.
- Place a domino horizontally to the right of the seventh domino, covering two squares.
- Place a domino vertically below the eighth domino, covering two squares.
- Place a domino horizontally to the right of the ninth domino, covering one square.
- Place a domino vertically below the tenth domino, covering two squares.
- Place a domino horizontally to the right of the eleventh domino, covering one square.
- Place a domino vertically below the twelfth domino, covering two squares.
- Place a domino horizontally to the right of the thirteenth domino, covering two squares.
- Place a domino vertically below the fourteenth domino, covering two squares.
- Place a domino horizontally to the right of the fifteenth domino, covering one square.
- Place a domino vertically below the sixteenth domino, covering two squares.
- Place a domino horizontally to the right of the seventeenth domino, covering one square.
- Place a domino vertically below the eighteenth domino, covering two squares.
- Place a domino horizontally to the right of the nineteenth domino, covering one square.
Repeat this pattern until all the dominoes are placed on the board, filling each square exactly once.
Puzzle 6 Answer

To solve this equation, we need to follow the order of operations, also known as PEMDAS. First, we perform any calculations inside parentheses, but there are no parentheses in this equation. Next, we evaluate any exponents or square roots, but again, there are none in this equation. Then, we perform any multiplication or division from left to right. In this case, we have 3 multiplied by 2, which equals 6, and 4 divided by 2, which equals 2. Finally, we perform any addition or subtraction from left to right. We have 9 plus 6 minus 2, which equals 13.
However, it is important to remember that multiplication and division should be performed before addition and subtraction. So, in this equation, we need to multiply 3 by 2 first, which equals 6, and then divide 4 by 2, which equals 2. Next, we add 9 and 6, which equals 15. Finally, we subtract 2 from 15, giving us the final answer of 13.
Therefore, the correct answer to puzzle 6 is 15. It is crucial to follow the order of operations when solving mathematical equations to arrive at the correct solution.